How to Create a Roller Coaster Game in HTML5
In this tutorial we are going to implement an HTM5 roller coaster game, based on an older roller coaster tutorial I&#;ve written in as3, a long time long time ago, when flash was alive as dinosaurs were sometimes. We are going use the createjs library and to implement the game from scratch in typescript which is transpilled in javascript. I decided to publish this tutorial because I want to use as a base for an educational game I’m going to create for roller coaster games, in which to study the movement of a roller coaster cart along a pathway.
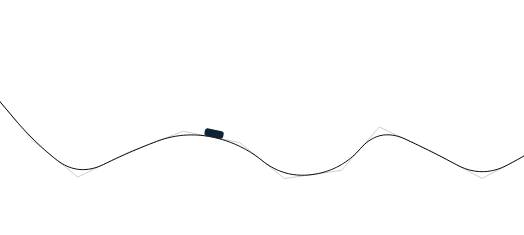
Here is an interactive version of the html5 roller coaster game we are going to have at the end of this tutorial:
The tutorial is divided 3 parts:
- Drawing Segments That Defines The Roller Coaster Rail – In the first part we are going to create the segment on which the track of the roller coaster is based.
- Generating Rail Points Using Bezier Curves – In this part we are using Bezier curves to draw the rail and to determine the trajectory points, points which are useful both for drawing the trail and to move the cart along it.
- Implementing Roller Coaster Cart Physics – In the last part we are going to write the code which animate the roller coaster along the curve.
1. Drawing Rail Segments
In the first part the code does not have much to do with a roller coaster game. Not even with a game. We are implementing to code to draw segments of a predefined length when we press the mouse button and keep it pressed while we move the mouse. We begin by creating a class and adding the three methods to handle the mouse down, mouse move and mouse up events.
All the events are performed on the stage object( which in createjs is the main object where all the other graphical objects are added ). We are also adding another object where we are doing all the drawing operations:
class RollercoasterTest1 extends createjs.Container
{
    public constructor()
    {
        super();

        this.addEventListener( "added", (e:Event) => {
            if ( (e.target as any).stage != null ) {
                this.stage.on("stagemousedown", (e:createjs.Event) => { this.mouseDown(e); });
                this.stage.on("stagemousemove", (e:createjs.Event) => { this.mouseMove(e); });
                this.stage.on("stagemouseup", 	(e:createjs.Event) => { this.mouseUp(e); } );
            }
        } );

        this.addChild(this.drawingShape);
    }

    private  mouseDown(e:createjs.Event):void {}
    private  mouseMove(e:createjs.Event):void {}
    private  mouseUp(e:createjs.Event):void {}
}
In addition to what we have until now, we need to add a few member variables:
// a parameter which indicates the lengths of a segment;
    private SEGMENT_LENGTH:number = 60;

    // the points defining the segments
    private segmentPoints:createjs.Point[] = [];

    // the last point added when moving the mouse
    private currentPoint:createjs.Point;

    // when true it mean the mouse button is down and the player draws segments
    private drawing:boolean = false;

    // drawing shape
    private drawingShape = new createjs.Shape();
- SEGMENT_LENGTH – represents the length of a segment. Once the distance between the previous point and the current mouse position exceeds 60 pixels we add a new point to our list
- segmentPoints – an array which holds the points we are adding
- currentPoint – this is the last point which was added in the segmentPoints array. We could retrieve it using segmentPoints[ segmentPoints.length – 1 ], but it we declare it as a member to make the code more readable and less verbose.
- drawing – a boolean which is true if we are in the process of drawing segments, otherwise is false. Initially is false, when we press the mouse button it gets true, when the mouse button is up it turns to false. In short the drawing is true as long as the mouse button is down; the code in mouseMove will execute only when the drawing is true.
Now let’s start implementing the mouse down event:
private  mouseDown(e:createjs.Event):void {

        this.segmentPoints = [];
        this.drawing = true;

        this.drawingShape.graphics.clear();

        var mouse:createjs.Point = this.globalToLocal( this.stage.mouseX, this.stage.mouseY );
        this.currentPoint = new createjs.Point( mouse.x, mouse.y );
        this.segmentPoints.push( this.currentPoint );

        this.drawingShape.graphics.setStrokeStyle(1).beginStroke('#CCCCCC');
        this.drawingShape.graphics.moveTo(0, mouse.y );
        this.drawingShape.graphics.lineTo(2000, mouse.y );
    }
The code reset everything: it empties the segmentPoints array, sets the drawing true and clear the drawing area; it takes the coordinates of the current point and it adds it to the segment points as the first point. Then it draws a horizontal line to be a reference line to easily see how high is the initial point.
In mouseMove method, we read the current mouse position and if the distance to the previous one is higher than SEGMENT_LENGTH we add the current point to the segmentPoints array and draw the new segment in the drawingShape:
private  mouseMove(e:createjs.Event):void {
        if ( !this.drawing ) return;

        var mouse:createjs.Point = this.globalToLocal( this.stage.mouseX, this.stage.mouseY );
        var dx:number = mouse.x - this.currentPoint.x;
        var dy:number = mouse.y - this.currentPoint.y;
        var d:number = Math.sqrt( dx * dx + dy * dy );

        if (d >= this.SEGMENT_LENGTH)
        {
            var a:number = Math.atan2(dy, dx);
            this.currentPoint = new createjs.Point( this.currentPoint.x + this.SEGMENT_LENGTH * Math.cos(a), this.currentPoint.y + this.SEGMENT_LENGTH * Math.sin(a));
            this.segmentPoints.push( this.currentPoint );

            this.drawingShape.graphics.lineTo(this.segmentPoints[this.segmentPoints.length-2].x, this.segmentPoints[this.segmentPoints.length-2].y);
            this.drawingShape.graphics.lineTo(this.currentPoint.x, this.currentPoint.y);
        }
    }
In the last step, we add and draw the last segment, when the mouse is up:
private  mouseUp(e:createjs.Event):void
    {
        var mouse:createjs.Point = this.globalToLocal( this.stage.mouseX, this.stage.mouseY );

        this.segmentPoints.push(new createjs.Point( mouse.x, mouse.y ));
        this.drawingShape.graphics.lineTo( mouse.x, mouse.y );

        this.drawing = false;
    }
2. Generate Roller Coaster Rail Using Bezier Curves
In the previous step we wrote code which allows us to draw the segments. Of course a roller coaster game would not look too natural if the roller coaster goes on trails with such sharp angles. We need to come with an algorithm to generate the rail based on the segments we just draw in the previous step. The Bezier method to generate curves is the one which fits very well our requirements.
When are are implementing the bezier curve, what we obtain is not really a curve. It’s a set of tiny segments which our eye perceive as a curve, but in reality it’s just an approximation of a curve. When we are moving the rail on the curve, we are really moving it along those tiny segments. The segments are small enough, so we perceive the movement as continuous along a curve.
First of all we implement an new class to hold the position of the existing point and the distance and angle to the next point. Those are required especially for moving part, to make sure we are not calculating them ever and ever again each time the cart is at a specific location:
class TrajectoryPoint
{
    public constructor(xx:number, yy:number)
    {
        this.x = xx;
        this.y = yy;
    }

    // postion
    public x:number;
    public y:number;

    // distance to the next point
    public dx:number;
    public dy:number;

    // angle to the next point
    public angle:number;
}
Now we are going to create a class, BezierAssist to help us to generate the bezier points. Bezier curves can be generated to create intermediary points for 2,3 or 4 points. Bezier assist is based on the following method which checks if we want to generate the bezier segments for 2,3 or 4 points:
public static bezierPoint(p:createjs.Point[], t:number):createjs.Point
    {
        if (p.length == 2)
            return this.linearBezierPoint(p, t);
        if (p.length == 3)
            return this.quadraticBezierPoint(p, t);
        if (p.length == 4)
            return this.quadraticBezierPoint(p,t);//cubicBezierPoint(p, t);

        return null;
    }
We also implement the linearBezierPoint, quadraticBezierPoint and cubicBezierPoint( actually we can skip the last one, because the quadratic curve is enough ). The linearBezierPoint does not create a curve, we use it to split a segment in smaller segments. Each call to the function returns us a specific point, for the progress specified by t. T is between 0 and 1, for 0 we are getting the same coordinated as the first point, 1 we are getting the same coordinates as the second point, for 0.5 we get exactly the middle. If we need to get 10 points we call the method 10 times with 0.1 intervals.
public static linearBezierPoint(p:createjs.Point[], t:number):createjs.Point
    {
        if ( t < 0 || t > 1 || p.length != 2 ) return null;

        return new createjs.Point(
            p[0].x + ( p[1].x - p[0].x ) * t,
            p[0].y + ( p[1].y - p[0].y ) * t
        );
    };
The following method is similar to the previous one, to create the curve segments for 3 points by running it for each small segment. Here is the implementation of the method:
public static quadraticBezierPoint(p:createjs.Point[], t:number):createjs.Point
    {
        if (t < 0 || t > 1 || p.length != 3) return null;

        var ax:number, bx:number;
        bx = 2*(p[1].x-p[0].x);
        ax = p[2].x - p[0].x - bx;

        var ay:number, by:number;
        by = 2*(p[1].y - p[0].y);
        ay = p[2].y - p[0].y - by;

        var t2:number = t*t;

        return new createjs.Point(
            ax * t2 + bx*t + p[0].x,
            ay * t2 + by*t + p[0].y
        );
    };
The quadratic method is used to generate the intermediate points. Based on the parameter t, and the point [P0, P1, P2] we get the point B.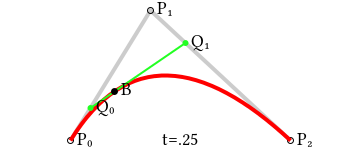
Of course we need to run quadraticBezierPoint repeatedly, depending on how many segments we want to generate. We are going to divide 1 by the number of segments we want to obtain and to run it step by step for to calculate intermediate each point. The bezier method in BezierAssist does exactly what this animation does:
 It takes every 3 points we draw and it creates intermediate bezier points invoking the previous defined methods:
static bezier(p:createjs.Point[], segments:number):TrajectoryPoint[] {
        if (segments < 1) null;

        if (p.length < 2 || p.length > 4)
            return null;

        var points:TrajectoryPoint[] = [];

        var dt:number = 1 / segments;
        var s:createjs.Point = BezierAssist.bezierPoint(p, 0);

        for (var i:number = 1; i <= segments; i++)
        {
            s = BezierAssist.bezierPoint(p, i * dt);

            points.push( new TrajectoryPoint( s.x, s.y) );
        }

        return points;
    }
Now, at this stage we need to add the bezier functionality in the main class. First we add the following adday to hold the bezier points:
// keeps the intermediate bezier points from the bezier curve
    private bezierLines:TrajectoryPoint[];
Next we add the a method to generate bezier points for every segment we draw and to draw the line:
private  generateBezier():void
    {
        this.bezierLines = [];

        var p1,p2,p3,mid1,mid2:createjs.Point;

        p1 = BezierAssist.linearBezierPoint([this.segmentPoints[0], this.segmentPoints[1]], 0.5);

        this.bezierLines.push( new TrajectoryPoint(this.segmentPoints[0].x, this.segmentPoints[0].y));// {x: segmentPoints[0].x, y: segmentPoints[0].y});

        for (var i:number=0; i < this.segmentPoints.length-2; i++)
        {
            p1 = this.segmentPoints[i];
            p2 = this.segmentPoints[i+1];
            p3 = this.segmentPoints[i+2];
            mid1 = BezierAssist.linearBezierPoint([p1, p2], 0.5);
            mid2 = BezierAssist.linearBezierPoint([p2, p3], 0.5);

            this.bezierLines = this.bezierLines.concat(BezierAssist.bezier([mid1, p2, mid2], 20));

            //this.track.graphics.lineTo(p3.x, p3.y);
        }

        if ( this.segmentPoints.length > 2 )
            this.bezierLines.push(new TrajectoryPoint(p3.x, p3.y) );

        // draw bezier curve
        this.drawingShape.graphics.setStrokeStyle(1).beginStroke('#000000');
        this.drawingShape.graphics.moveTo( this.bezierLines[0].x, this.bezierLines[0].y );

        this.bezierLines.forEach(p => {
                this.drawingShape.graphics.lineTo( p.x, p.y );
        });

        for (i=0; i < this.bezierLines.length-1; i++) {
            var a:TrajectoryPoint = this.bezierLines[i];
            var b:TrajectoryPoint = this.bezierLines[i+1];
            a.dx = b.x - a.x;
            a.dy = b.y - a.y;
            a.angle = Math.atan2(a.dy, a.dx);
        }

        this.bezierLines.pop();

    }
The we call the bezier when the mouse is up:
private  mouseUp(e:createjs.Event):void
    {
        ... // existing code

        this.generateBezier();
    }
Implementing the roller coaster physics
Until now we have the trail, now we need to make the rollercoaster to move on the trail. The fact that we already have the bezier points will help us a lot. The Bezier points are not used only for drawing but also to move the roller coaster; if you remember, each bezier point(TrajectoryPoint) holds not only the coordinates, but also the distance to the next one and the angle.
Now we are adding the following member variables:
private moving:boolean = false;

    private cart:Cart = new Cart();

    private FRICTION:number = 1.0;
    private GRAVITY:number = 0.1;
Those are the following ones:
- moving – is a variable which is true when the chart is moving. It’s the opposite of drawing, with the only difference that moving is false if the track we draw is not valid.
- FRICTION and GRAVITY are to parameters which don’t need much explanation. We can change them to see how they influence the move.
- cart – is the variable which holds the graphics object. We don’t use fancy graphics for our roller coaster as of now, we use a simple rectangle. The roller coaster cart also has 2 member variables:
- line – holds the index of the current bezier point
- speed – the current speed of the cart
class Cart extends createjs.Container
{
    public line:number = 0;
    public speed:number = 0;

    public constructor()
    {
        super();

        var cart = new createjs.Shape();
        cart.graphics.beginFill( '#123' ).drawRoundRect(-10, -8, 20, 8, 3);
        this.addChild( cart );
    }
}
In the constructor we add a new event which gets triggered every tick:
public constructor()
    {
        ...

        this.on( 'tick', this.onTick );
    }
When the mouse is up we add the Cart to the scene and if the bezier has enough points we set moving variable to true:
private  mouseUp(e:createjs.Event):void
    {
        ...

        this.addChild( this.cart );
        this.cart.x = this.bezierLines[0].x;
        this.cart.y = this.bezierLines[0].y;
        this.cart.rotation = 180 * this.bezierLines[0].angle / Math.PI;
        this.cart.speed = 0;
        this.cart.line = 0;

        if ( this.bezierLines.length > 0 )
            this.moving = true;
    }
In onTick if moving variable is true, we get the current trajectory point, adjust the speed parameter, update the card positon by running the run method and update the cart rotation:
private  onTick(e:createjs.Event):void
    {
        if ( this.moving )
        {
            // get the current point
            var point:TrajectoryPoint = this.bezierLines[this.cart.line];

            // adjust the speed for the current step
            this.cart.speed += Math.sin( point.angle ) * this.GRAVITY;
            this.cart.speed *= this.FRICTION;

            // move the cart
            this.run(this.cart.speed);

            // rotate the cart( to the precalculated angle of the current point)
            this.cart.rotation = 180 / Math.PI * this.bezierLines[this.cart.line].angle;


        }
    }
The last method is the one which calculate the new position of the roller coaster:
private  run(distance:number):void
    {
        var point:TrajectoryPoint = this.bezierLines[this.cart.line];

        if (this.cart.speed == 0)
        {
            console.log('roller coaster has stopped');
            this.moving = false;
            return;
        }

        var ex:number = point.x, ey:number = point.y;

        if (this.cart.speed >= 0) {
            ex += point.dx;
            ey += point.dy;
        }

        var dx:number = ex - this.cart.x;
        var dy:number = ey - this.cart.y;

        var d:number = Math.sqrt(dx*dx + dy*dy);

        if ( d < Math.abs(distance) ) {

            this.cart.x = ex;
            this.cart.y = ey;
            this.cart.line += this.cart.speed > 0 ? 1 : -1;

            if (this.cart.line === -1 || this.cart.line === this.bezierLines.length) {
                // if we are at the end reverse the current line and the speed
                this.cart.line -= this.cart.speed > 0 ? 1 : -1;
                this.cart.speed *= -0.3;
            }
            else {
                //
                this.run(( Math.abs(distance) - d) * Math.abs(distance) / distance );
            }

        } else {
            // adjust distance
            this.cart.x += distance*Math.cos(point.angle);
            this.cart.y += distance*Math.sin(point.angle);
        }
    }
How to Create a Roller Coaster Game in HTML5
You can learn here how you can develop your own roller coaster game in HTML5, writing it from scratch in typescript or javascript. This tutorial is structured in 3 sections: Drawing Rail Segments, Generate Roller Coaster Rail Using Bezier Curves and Implementing the Roller Coaster Physics.

How To Create Classes in ECMA5 in CreateJS Style
Explore the fundamentals of creating classes in ECMA5 styled after CreateJS. Learn about the intricacies of ECMA5 prototype-based object-oriented language and the art of emulating class inheritance. Understand the role of namespaces, anonymous functions, and constructors, offering you an alternate way to define classes, which is particularly handy if you are still working with game frameworks that do not fully support ECMA6. A clear understanding of these concepts will significantly elevate your HTML5 game development process.
How to Create a Roller Coaster Game in HTML5
You can learn here how you can develop your own roller coaster game in HTML5, writing it from scratch in typescript or javascript. This tutorial is structured in 3 sections: Drawing Rail Segments, Generate Roller Coaster Rail Using Bezier Curves and Implementing the Roller Coaster Physics.