How to convert ASCII characters to integer keycodes(binary, decimal or hexadecimal)
Purpose of this ASCII Converter
The ASCII converter webpage developed in this tutorial offers a versatile tool for converting between different ASCII formats—decimal, binary, hex—and plain text. This functionality caters to a wide range of applications, from programming and data analysis to educational purposes, enhancing understanding of how digital systems represent characters.
Overview of ASCII
Before starting with this tutorial, let's check a few facts about ASCII(American Standard Code for Information Interchange)
- a character encoding standard for electronic communication
- ASCII codes represent text in computers, telecommunications equipment, and other devices that use text.
- Most character-encoding schemes are based on ASCII, although they support many additional characters.
- The utility of ASCII extends beyond simple text display; it facilitates the conversion of text to binary and vice versa, enabling efficient data storage and transmission.
Building an ASCII Converter Web Page: A Step-by-Step Guide
Creating an ASCII converter web page can seem daunting at first, but with the right guidance, it can be a rewarding project that enhances your understanding of character encoding and web development. In this tutorial we will walk through the process of building a versatile ASCII converter that can handle various formats including ASCII (Decimal), ASCII (Binary), ASCII (Hex), and plain text. We'll incorporate functionalities for file loading and saving, making the tool both comprehensive and user-friendly.
Step 1: Setting Up Your HTML Structure
Let's begin by setting up the basic structure of your web page. We start with a blank html webpage, using the HTML5 doctype for modern web standards and include the Bootstrap CSS for styling. Here's a simplified version of the initial setup:
<!doctype html>
<html lang="en">
<head>
    <meta charset="utf-8">
    <meta name="viewport" content="width=device-width, initial-scale=1">
    <link href="https://cdn.jsdelivr.net/npm/[email protected]/dist/css/bootstrap.min.css" rel="stylesheet">
    <title>ASCII Converter</title>
</head>
<body>
    <div class="container">
        <!-- Your content will go here -->
    </div>
</body>
</html>
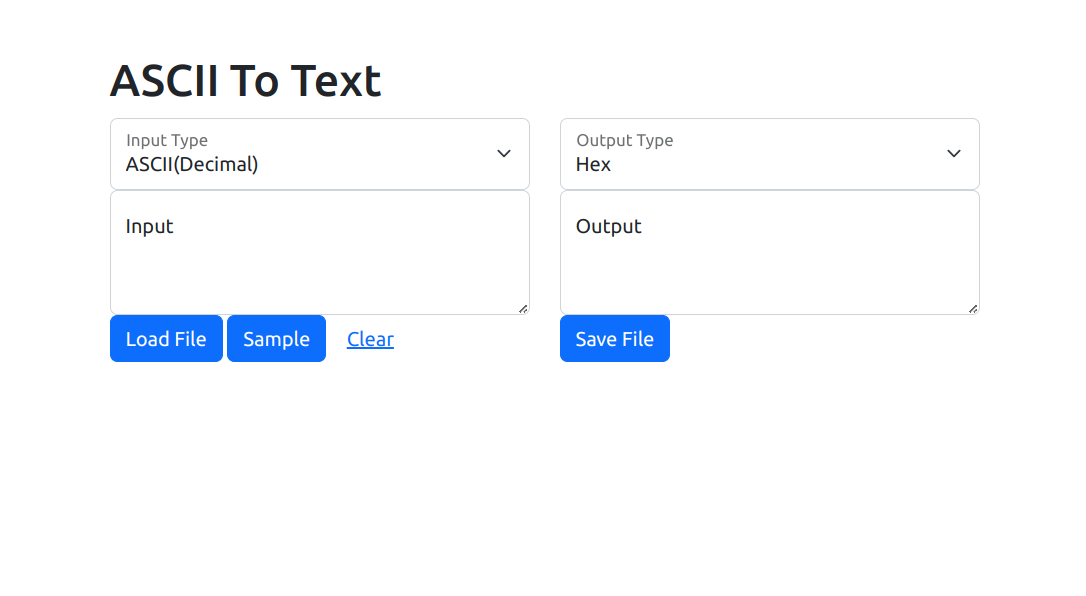
Step 2: Designing the ASCII Convertor User Interface
Within the body, we structure our interface with two main columns: one for input and another for output, utilizing Bootstrap's grid system to create a responsive layout. Then, we add form elements to each column for selecting input and output types, and textareas for the data. Here's is how to layout our UI components:
<div class="container">
    <div class="row">
        <h1>ASCII To Text</h1>
    </div>
    <div class="row">
        <div class="col">
            <!-- Input selection and area -->
            <div class="form-floating">
                <select class="form-select" id="selectInputType">
                    <option value="ascii">ASCII(Decimal)</option>
                    <option value="binary">ASCII(Binary)</option>
                    <option value="hex">ASCII(Hex)</option>
                    <option value="text">Text</option>
                </select>
                <label for="selectInputType">Input Type</label>
            </div>
            <div class="form-floating">
                <textarea id="inputBox" class="form-control" style="height: 100px"></textarea>
                <label for="inputBox">Input</label>
            </div>
            <button id="btnLoadFile" type="button" class="btn btn-primary">Load File</button>
            <button id="btnSample" type="button" class="btn btn-primary">Sample</button>
            <button id="btnClear" type="button" class="btn btn-link">Clear</button>
        </div>
        <div class="col">
            <!-- Output selection and area -->
            <div class="form-floating">
                <select class="form-select" id="selectOutputType">
                    <option value="binary">Binary</option>
                    <option value="decimal">Decimal</option>
                    <option value="hex">Hex</option>
                    <option value="text">Text</option>
                </select>
                <label for="selectOutputType">Output Type</label>
            </div>
            <div class="form-floating">
                <textarea id="outputBox" class="form-control" style="height: 100px"></textarea>
                <label for="outputBox">Output</label>
            </div>
            <button id="btnSaveFile" type="button" class="btn btn-primary">Save File</button>
        </div>
    </div>
</div>
Step 3: Implementing ASCII Conversion Logic in JavaScript
With your UI ready, it's time to write the conversion logic. This involves handling ASCII values, binary, hex, and text. We'll need to create functions to convert between these formats. For example, this is how the simplified version of the ASCII to text conversion function looks like:
function asciiToText(str, inputType) {
    return str.split(' ').map(function(code) {
        switch(inputType) {
            case 'binary':
                return String.fromCharCode(parseInt(code, 2));
            case 'hex':
                return String.fromCharCode(parseInt(code, 16));
            default:
                return String.fromCharCode(parseInt(code, 10));
        }
    }).join('');
}
Similarly, we need to write the textToAscii function for converting text into ASCII, binary, or hex based on the output format selected by the user.
Step 4: Handling User Interactions
We need to listen for changes in the input type, output type, and any input provided by the user and to implement event listeners for these elements. When an event is triggered, we call the appropriate conversion function and update the UI accordingly. Blow is the code to set up these listeners:
document.addEventListener("DOMContentLoaded", function() {
document.getElementById("selectInputType").addEventListener("change", handleConversion);
document.getElementById("selectOutputType").addEventListener("change", handleConversion);
document.getElementById("inputBox").addEventListener("input", handleConversion);

document.getElementById("btnSample").addEventListener("click", fillSampleData);
document.getElementById("btnClear").addEventListener("click", function() {
    document.getElementById("inputBox").value = '';
    document.getElementById("outputBox").value = '';
});

document.getElementById("btnLoadFile").addEventListener("click", function() {
    document.getElementById("hiddenFileInput").click();
});

document.getElementById("hiddenFileInput").addEventListener("change", function(e) {
    if (e.target.files.length > 0) {
        loadFile(e.target.files[0]);
    }
});
In this continuation, we've added the functionality for loading files, which allows users to upload a file whose content will then be displayed in the input box. Additionally, the btnSaveFile event listener enables users to save their converted data as a text file, providing a seamless way to export their work.
document.getElementById("btnSaveFile").addEventListener("click", function() {
    var content = document.getElementById("outputBox").value;
    var blob = new Blob([content], {type: 'text/plain'});
    var downloadLink = document.createElement("a");
    downloadLink.href = URL.createObjectURL(blob);
    downloadLink.download = `output.${document.getElementById("selectOutputType").value}.txt`;
    document.body.appendChild(downloadLink);
    downloadLink.click();
    document.body.removeChild(downloadLink);
});
We also add the fillSampleData and loadFile functions are implemented based on the specific requirements.
Handling the ASCII conversion type
The handleConversion function is central to the application's functionality, dynamically converting the input based on the selected input and output formats:
function handleConversion() {
const inputBox = document.getElementById("inputBox");
const inputType = document.getElementById("selectInputType").value;
const outputType = document.getElementById("selectOutputType").value;
const outputBox = document.getElementById("outputBox");

  let inputData = inputBox.value;
  let result = '';

  // Determine the conversion based on input and output types
  if(inputType === 'text') {
      result = textToAscii(inputData, outputType);
  } else {
      result = asciiToText(inputData, inputType);
  }

outputBox.value = result;
}
This comprehensive approach not only gives users the ability to convert between different ASCII representations and text but also enhances the tool with practical features for real-world applications. Whether for educational purposes, data formatting, or programming tasks, this ASCII converter web page offers a versatile solution.
Conclusion
By following these steps, we've built a functional ASCII converter web application that can handle various formats and provide user-friendly features like file loading and saving. This project not only demonstrates the ability to work with ASCII data in JavaScript but also improve the skills in creating responsive web interfaces with Bootstrap.
How to Create a Roller Coaster Game in HTML5
You can learn here how you can develop your own roller coaster game in HTML5, writing it from scratch in typescript or javascript. This tutorial is structured in 3 sections: Drawing Rail Segments, Generate Roller Coaster Rail Using Bezier Curves and Implementing the Roller Coaster Physics.

Tips&Tricks to Port and Convert Your Games from ActionScript3 to CreateJs and Typescript
Explore how to transition from ActionScript 3 to CreateJS and TypeScript. TypeScript offers better code maintenance for complex projects, while CreateJS mimics the Flash class hierarchy, ensuring familiarity. Key differences include mandatory "this" usage in TypeScript and new event handling in CreateJS. Learn more in our guide for a smooth switch to HTML5 game development.